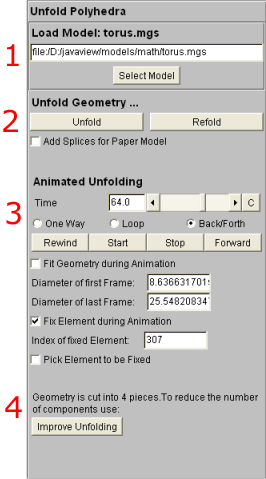
| The unfold panel consists of four parts, as shown in the figure on the right.
1. Load Model
This dialog allows to choose a geometry from a list. Click the Select Model button and select a model in the popup dialog. Press OK to close the dialog.
2. Unfold Geometry
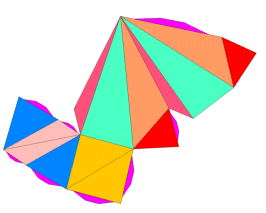
Press the Unfold button to unfold the geometry. The Refold button restores the original vertex coordinates (but leaves the geometry cut open). Activate the Add Splices for Paper Model and unfold the model, to create splices that help to build a paper model, see figure bottom right.
3. Animated Unfolding
Press the Start, Stop, Rewind and Forward buttons to control the animation. Select One Way, Loop or Back/Forth to activate the desired playing mode. If the Fit Geometry during Animation checkbox is activated, the camera zoom onto the geometry during the animation. This is done by a linear interpolation between the first and the last frame. The
size of these frames can be adjusted by editing the text fields. It may be useful to center the camera on the geometry, to do this focus the mouse over the display and press 'c'. Activating the Fix Element During Animation checkbox fixes the position of one element in space while the animation runs. This avoid unnecessary movement of the geometry. Choose the element to be fixed by either
typing the index to the text field or picking an element to be fixed. To pick an element, activate the Pick Element To Be Fixed checkbox, press and hold 'i' and use the mouse to click on the element. Than release 'i'.
4. Improve Unfolding
This part of the dialog appears only if the basic unfolding method produced an unfolding with more than one piece. Pressing the Improve Unfolding button starts a process that rearranges the unfolding in order to reduce the number of components. The number of components in the text above the button is updated during the running time.
|
|

Unfold Panel
|

Paper Model generated
using this applet.
|
|