
Let there be light... (but not too much!)
Excitedly, you download the latest batch of photos off your digital camera only to find that last week's picnic watching a sensational sunset is shrouded in darkness, and your friend appreciating the view out of the window is reduced to a silhouette against a glaring sky.
We have all taken a photo only to be disappointed at how it turns out; even professional photographers have to go to great lengths to cope with tricky lighting. Our computer screens, and even our photo prints, can't display the full range of contrast that we see in real life, resulting in under- or over-exposed images. But researchers at MIT have come up with a new technique that will make correcting the lighting of our digital photos quick and easy.
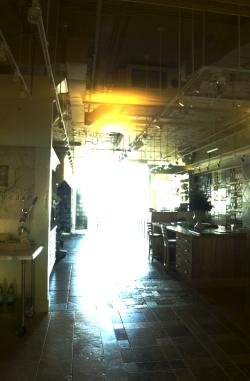
The light from the window overpowers the detail of the interior when this photo is displayed on the screen.
[HDR image: B. Mok Oh]
Over- and under-exposure are the main reasons people are unhappy with their photos, said Frédo Durand from the Computer Graphics Group at a recent conference at MIT, and better tonal management is also needed in other applications, such as medical imaging and video surveillance. In real life the contrast range might be in the order of 1 to 10,000 - that is, the brightest part of a scene is 10,000 times brighter than the darkest shadow. However, our computer screens and photo printers can only display a range of around 1 to 100, "making it impossible to reproduce contrast in real scenes". As new technology makes it possible for cameras to capture more and more of the contrast that appears in real life (in what is called high dynamic range, or HDR, images), there is a growing demand to be able to display these images recognisably on our computer screens and in our photo albums.
A digital photo is made up of millions of pixels, each one appearing as a dot on your screen but actually stored digitally as three numbers, representing the intensity of the colours red, green and blue of the image at that point. A colour HDR image, like the one of the interior shown here, can't immediately be viewed at its full glory onscreen - the light from window overpowers the interior
hiding all the detail in glare or shadow. But by manipulating the pixel values mathematically, the team at MIT can reproduce the contrast of the real scene.
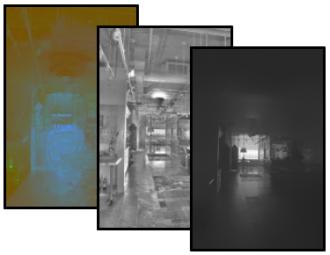
The photo is separated into the colour, detail and base layers.
First the overall intensity is stripped out of the image, by taking a weighted average of the intensities of red, green and blue for each pixel. This splits the image into an intensity layer - resembling a black and white photo - and a layer containing the colour information. The intensity layer is then split again into a detail layer and a layer containing large-scale changes in intensity.
The large-scale layer, called the base layer, is produced by smoothing out the intensity across the image, while preserving the edges of regions of sharp contrast - such as around the window - to avoid "haloing effects" in the final image. Applying a standard smoothing filter such as the Gaussian blur used in many image processing programmes is not enough, as the edges will be lost: "Your estimate of whether a pixel is in a bright or dark region is totally corrupted by what is on the other side of the strong edge," said Durand. So instead what is called a bilateral filter is applied. This calculates an average for each pixel of the intensity of its neighbours, weighted in favour of pixels that are not only close by, but also are similar in intensity.
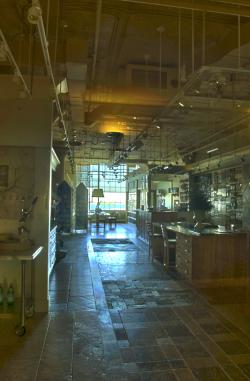
The photo after having the large-scale contrast reduced - now that is more like it!
And here is the secret of the technique's success - taking advantage of the human visual system. The human eye is not very sensitive to large-scale variation, Durand said, and instead cares more about local contrast. So the contrast is reduced just in the large-scale base layer, for example by taking the square root of the pixel values to reduce the original contrast (say 1 to 10,000) to one which most computer screens will be able to display accurately (say 1 to 100). By reducing only the information in the base layer, no detail or colour information is lost, and the layers can be recombined to produce a very faithful rendition of how the original scene would have appeared to the naked eye.
Compared to similar image processing methods, the technique developed by the team at MIT is very fast and easy to use. And compared to what a professional had to do in traditional photo development, where parts of the image were shielded or revealed when printing to balance the light and dark areas, it is a doddle. Durand says that although their technique may not provide the sense of composition of a professional photographer, it does bring an amateur much closer to achieving a professional result.
Durand and his colleagues hope to extend their research to make our home movies better too. "The difference between your home video and a Hollywood movie", said Durand, "apart from your home movie having a better script, is [that Hollywood has] better lighting." It takes massive amounts of effort, and equipment, to light scenes evenly in professional film productions. But Durand hopes that the same technique of correcting the contrast in digital photos may also be applicable to digital home movies. "You don't get the full craft of the director of photography, but if we can put half the director of photography in your camera, that is a huge gain."
So Steven Spielberg and Ansell Adams beware...soon our ability to create the next big blockbuster or iconic image will be limited only by our imaginations.