
In the first part of this article we learnt what tricurves are, had a look at their phantoms, and asked how both shapes might be used to tile the plane. We'll now go on to see how we can tile other shapes.
Filling a Circle
We can start with any lens shape, fill it with a tricurve and get two left-over smaller lenses. Each smaller lens can in turn be filled with a tricurve with two left-over smaller lenses, and so on. Thus any lens can be filled with a series of ever-smaller tricurves. This also applies to the circle, which is itself a lens.
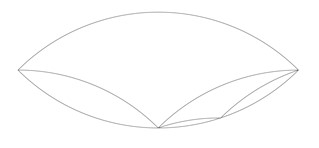
Levels of lenses.
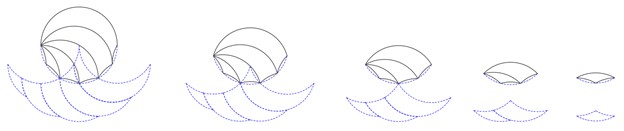
Filling a circle can be done in various ways. We'll use the convention here of starting with the largest possible tricurve at the top, then working down and out toward the lower half perimeter of the circle. We'll work downward and generally outward from the centre, leaving "remainder" small lenses against the perimeter of the bottom half. These perimeter lenses are then filled with progressively small tricurves, in an infinite series (of ever more of smaller tricurves at each "level").
Let's look at four approaches, going down only to a certain level of perimeter lenses.
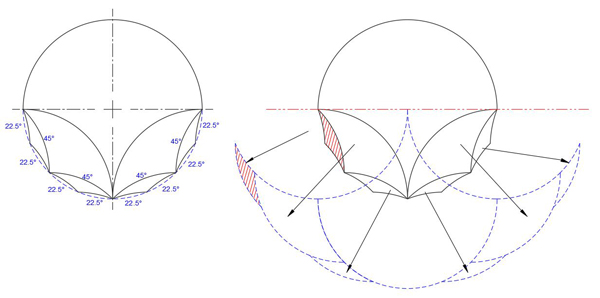
Case A is done symmetrically, with arcs divided by half at each level, as shown below: the first tricurve has arc angles 90°-90°-180°, the second 45°-45°-90°, and the third 22.5-22.5°-45°.
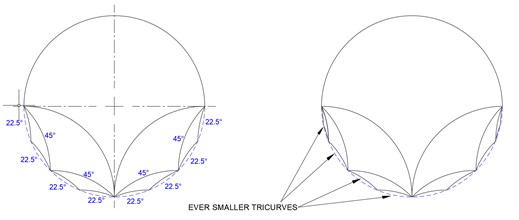
Symmetrical filling of a circle.
Alternatively, we can keep the smallest arc the same at 22.5° for all the main tricurves. This may be done with the small-end tails (with angle also 22.5°) emanating from the same point (Case B, below left), or with the large tricurves alternating (Case C, below right):
Cases B and C.
Note these two examples use the same seven main tricurves, just arranged differently. The top tricurve in both cases is 22.5°-157.5°-180°.
Also note that all three above examples have the same number and size of lenses in the lower half perimeter; this happens to be eight 22.5° lenses, but these could be any sizes and number — or combination — that fill the lower 180°. These lenses in turn will eventually be filled with a succession of smaller tricurves.
Case D is a variation of Case B, but with ever-thinner main tricurves. For starters we can use tricurves with a 5° small angle (and of course 5° small arc), so the largest tricurve is 5°-175°-180°:
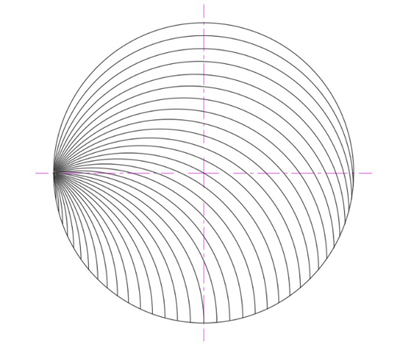
Thin tricurves.
The figure above doesn't show the 5° perimeter arcs and lenses in the lower half of the circle, since they are hard to distinguish at that size — and we'll make them yet smaller. The figure illustrates the idea, but eventually, as the size of the small arc goes to zero, the number of these main tricurves will go to infinity, and the perimeter lens size goes to zero. So there will be no perimeter lenses to fill. This seems the simplest and most elegant way to fill the circle.
Now, what are the phantoms doing?
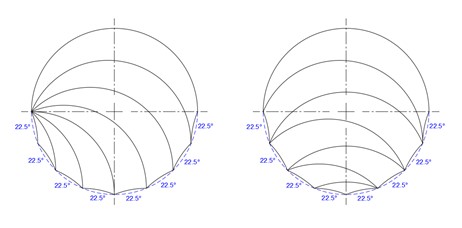
Consider the first three circle filling ways above (Cases A-C). The phantoms for these tricurves develop as shown here:
Case A phantoms.
In case A above, with symmetric tricurves, the tracking of the phantoms is somewhat easier, since each phantom is a mirror image of the original, placed on the line of symmetry that runs through the original tricurve.
The phantoms for the tricurves in Cases B and C are shown below:
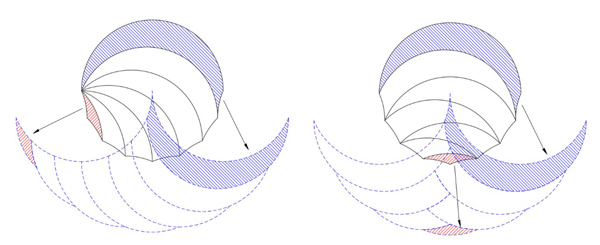
Phantoms for cases B and C.
The resulting shape outline is the same for all three above cases — what is happening here?
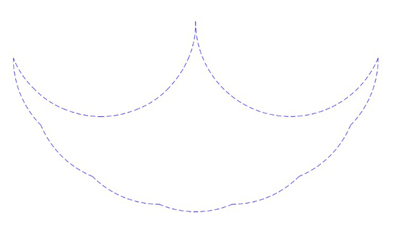
Mysterious outline of phantoms.
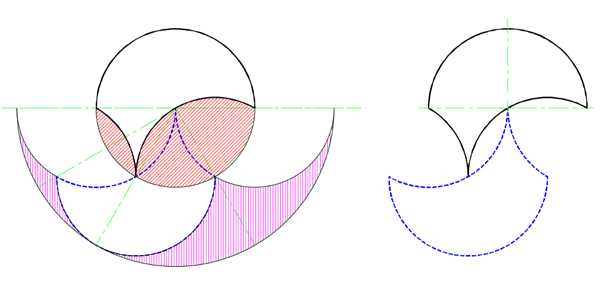
Note what happens as we continue by filling the circle's perimeter 22.5° lenses with tricurves. Assume for now that we keep filling the successive lenses with ever smaller tricurves that are symmetrical. Using Case A as an example:
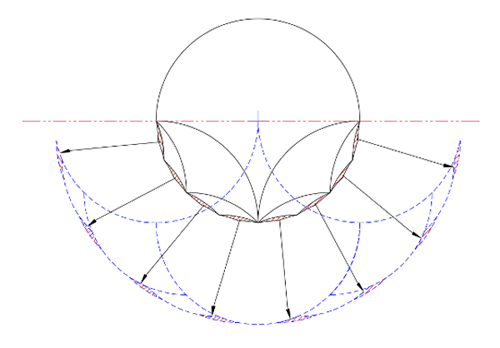
Filling in the cracks.
The effect is the same for all three cases A to C. With each level, the phantoms are filling in between bumps on the outside of the new shape, or extending the outer tips upward, at the limit approaching a full half circle with twice the diameter of the original circle. This is true even if the tricurves at any level aren't symmetrical or systematically sized. Thus the phantoms create and fill the same new shape: a symmetrical arbelos (a region bounded by three semi-circles), upside down.
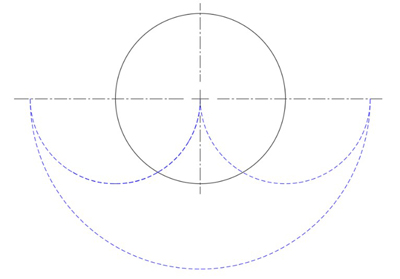
The resulting superphantom.
We get the same results when Case D is taken to the limit: as the number of tricurves in the circle approaches infinity, the phantom shape approaches the filled symmetrical arbelos:
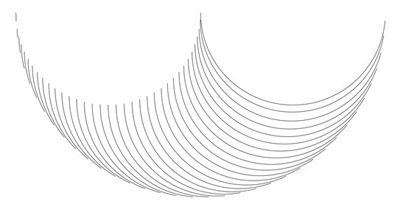
Case D conversion.
We could presumably do this in reverse, although it would be a little harder: we could start with the symmetric arbelos, fill it with tricurves in an infinite series, make the phantoms of those tricurves, and end up back at the filled circle. This is true regardless of how the circle is filled with tricurves. Since the filled symmetrical arbelos is the union of all the phantoms tricurves in the filled circle, let's call the symmetrical arbelos the superphantom of the circle. And vice versa: it's reversible. Thus the superphantom of a shape is the outline of the union of the phantoms of the infilling tricurves of that shape.
Back to lenses
What we did above for a circle we can do for any lens. Let's go back to case B above and look at the next lens down from the full circle, outlines in orange in the figure below. The superphantom of this red lens (down to the 22.5° level) is shown here:
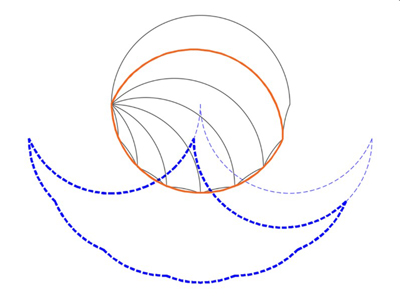
Sub-lens and its superphantom.
The lens and superphantom a few more levels down look like this:
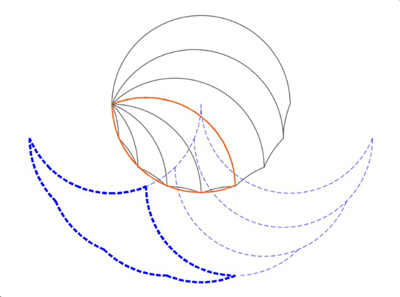
At another level.
If all the lenses at different levels are pulled out and put in the same orientation, they look like this:
Lenses and phantom sets of case B.
There are again a number of ways to fill the lens with tricurves, and again we can fill it below the 22.5° lens level. As we did for the circle, we take it to the limits. In the end, for any lens, the superphantom is a generalised symmetrical arbelos, where the arcs are something less than 180°. This has the three arcs with the same angle as the original lens. The relation of the lens to its superphantom can be laid out as shown below, compared to a similar tricurve and its phantom.
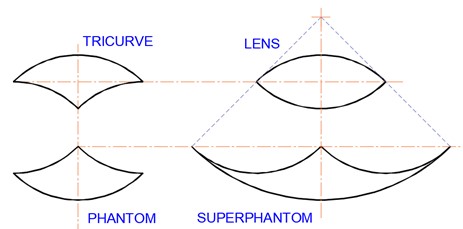
Lens and its superphantom.
Subtracting superphantoms
For this last section, note that a lens and its superphantom can be subtracted from a larger lens and its superphantom. In the sequence below, the original lens (left) has two smaller lenses (middle) removed (right) with attending changes to the superphantom.
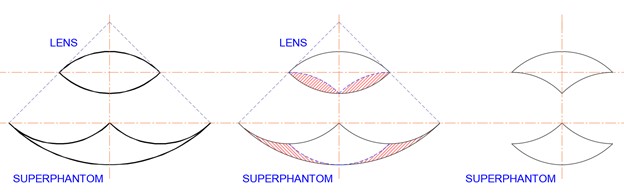
Subtracting two lenses.
This is shown in another example below, where two lenses are subtracted from a circle, and the two generalised symmetrical arbelos are subtracted from the full symmetrical arbelos.
Two lenses subtracted from a circle.
You might notice that in both the above figures, two smaller lenses were removed from a larger lens, creating a tricurve. The resulting reduced superphantom is also the phantom of that tricurve. It turns out that for any tricurve the superphantom is the same as the phantom!
We started this article with the simple idea that an arc can form the side of a shape. This has led us progressively to lenses, to tricurves, to phantoms, to filled circles, to superphantoms and to arbelos. And we could go further, putting together groups and patterns of circles and arbelos and their superphantoms, as was done for the title image of this article.
About the author

Tim Lexen on Mars.
Tim Lexen has been a mechanical engineer for 40+ years in various areas of new product R&D. He enjoys elegant solutions, the design process, tinkering, great communication, great stories, and family. He is married with 6 children and 10 grandchildren, and lives in the small town of Cumberland, Wisconsin, USA.